Table of Contents
Beyond Standard Workflows: The Strategic Value of Process Automation
In today’s fast-paced environment, doesn’t process automation represent one of the most significant opportunities for operational efficiency? Acumatica’s cloud ERP platform certainly offers robust workflow capabilities, and they don’t just stop at basic approval routing. Organizations that dive into implementing custom workflows can genuinely transform their business processes, all while keeping the crucial flexibility needed for their unique operational quirks.
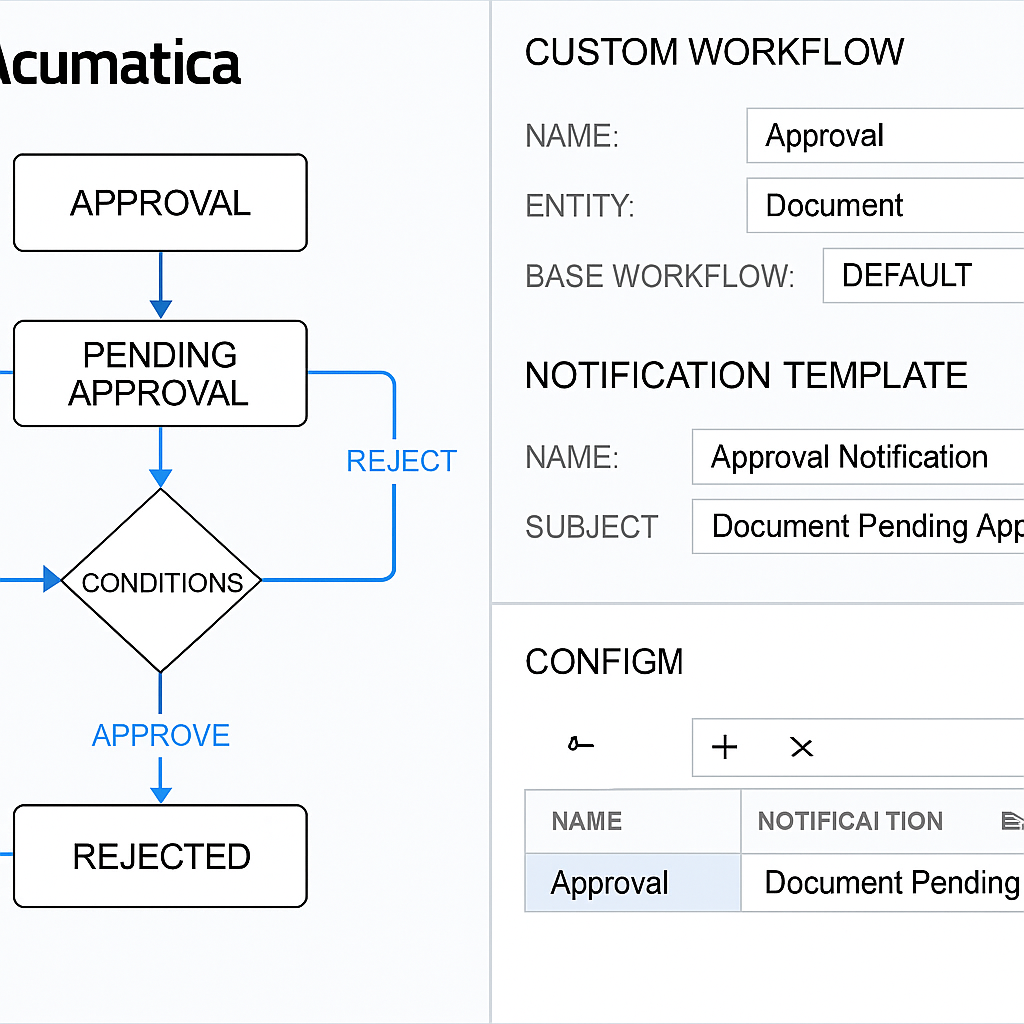
What sets Acumatica’s workflow engine apart? It’s largely its visual design approach. Instead of mandating custom coding or complex script development for every little thing, the system often employs an intuitive graphical interface for standard workflows. Here, process flows are mapped using connected nodes (think conditions, actions, and approvals). This design philosophy really lowers the technical barrier to automation, doesn’t it? It means business analysts and process owners can actually get their hands dirty and participate directly in workflow creation.
But what about those complex requirements that go beyond standard capabilities? That’s where custom workflow development steps in, offering unmatched flexibility and control. This guide isn’t just theoretical; it explores the technical nitty-gritty of implementing these advanced custom workflows in Acumatica, drawing from patterns I’ve seen succeed in numerous system deployments.
Strategic Workflow Applications
Before diving into technical implementation, it’s important to understand the strategic applications where custom workflows deliver the most value:
Cross-Module Orchestration
While individual module workflows offer significant value, processes that span multiple functional areas deliver transformational efficiency gains. For example, orchestrating the journey from sales order to fulfillment to invoicing to payment application creates a seamless order-to-cash process with appropriate controls and visibility at each stage.
Exception Handling and Escalation
Well-constructed workflows include timeout actions that trigger when approvals stall, escalation paths for urgent items, and delegation capabilities to maintain process continuity during absences. Organizations that thoughtfully address exception scenarios typically report fewer process bottlenecks and greater stakeholder satisfaction.
Document Generation Integration
Triggered document creation (whether for customer communications, internal documentation, or regulatory filings) can be embedded within workflow sequences. This integration ensures consistent, timely document production while maintaining version control and distribution tracking.
External System Integration
Integration with external systems through APIs expands workflow capabilities beyond Acumatica’s native functions. Well-designed workflows often incorporate calls to external services for specialized processing like tax calculations, credit checks, or industry-specific validations.
State Machine Design Principles for Acumatica Workflows
Custom workflows in Acumatica are effectively implemented using state machine design principles. A state machine consists of:
- States: The possible conditions an entity can exist in (e.g., Draft, Pending Approval, Approved, Rejected)
- Transitions: The allowed movements between states
- Guards: Conditions that must be met to allow a transition
- Actions: Operations performed during a transition
Implementing States in Acumatica
States are typically represented as enumeration values in a custom field. For example, a purchase requisition approval workflow might include the following states:
public class RequisitionStatus
{
    public const string Draft = "DR";
    public const string PendingApproval = "PA";
    public const string ApprovedLevel1 = "A1";
    public const string ApprovedLevel2 = "A2";
    public const string Rejected = "RJ";
    public const string Completed = "CO";

    public class ListAttribute : PXStringListAttribute
    {
        public ListAttribute()
            : base(
                new string[] { Draft, PendingApproval, ApprovedLevel1, ApprovedLevel2, Rejected, Completed },
                new string[] { "Draft", "Pending Approval", "Approved (Level 1)", "Approved (Level 2)", "Rejected", "Completed" })
        { }
    }
}
This approach defines both the technical state values and their user-friendly display labels.
Defining Transition Rules
Transition rules determine which state changes are valid under which conditions. These rules are typically implemented in the graph (business logic controller) associated with the document.
For example:
// Define allowed transitions from each state
protected virtual void _(Events.RowSelected<MyDocument> e)
{
    if (e.Row == null) return;

    PXUIFieldAttribute.SetEnabled<MyDocument.status>(e.Cache, e.Row, false);

    bool isEditable = e.Row.Status == MyDocumentStatus.Draft ||
                      e.Row.Status == MyDocumentStatus.Rejected;

    // Enable/disable controls based on current state
    PXUIFieldAttribute.SetEnabled<MyDocument.description>(e.Cache, e.Row, isEditable);
    PXUIFieldAttribute.SetEnabled<MyDocument.amount>(e.Cache, e.Row, isEditable);

    // Setup action availability based on state
    Submit.SetEnabled(e.Row.Status == MyDocumentStatus.Draft);
    Approve.SetEnabled(e.Row.Status == MyDocumentStatus.PendingApproval);
    Reject.SetEnabled(e.Row.Status == MyDocumentStatus.PendingApproval);
    SendBack.SetEnabled(e.Row.Status == MyDocumentStatus.Approved);
}
This method configures the UI based on the current state, enabling and disabling fields and actions appropriately.
Implementing Transition Actions
Actions represent the operations that change a document’s state. In Acumatica, these are implemented as PXAction handlers:
public PXAction<MyDocument> Submit;
[PXButton]
[PXUIField(DisplayName = "Submit")]
protected virtual IEnumerable submit(PXAdapter adapter)
{
    foreach (MyDocument doc in adapter.Get<MyDocument>())
    {
        // Perform validation before state change
        if (doc.Amount <= 0)
        {
            throw new PXException("Amount must be greater than zero.");
        }

        // Update state
        doc.Status = MyDocumentStatus.PendingApproval;
        doc.SubmittedDate = PXTimeZoneInfo.Now;
        doc.SubmittedBy = PXAccess.GetUserID();

        // Perform additional workflow actions
        NotifyApprovers(doc);

        this.Save.Press();
        yield return doc;
    }
}
This pattern allows for validation, state updates, and additional processing within a single logical operation.
Approval Hierarchy Implementation
Many custom workflows involve multi-level approvals based on organizational structure or authorization levels. Implementing this in Acumatica requires:
- Defining the approval hierarchy structure
- Determining the appropriate approvers at each stage
- Managing the approval flow through the hierarchy
Modeling Approval Hierarchies
Approvals typically follow either role-based patterns (based on user roles) or organizational patterns (based on reporting relationships). Both approaches can be modeled in Acumatica:
// Define approval level configuration
[PXTable]
public class ApprovalLevel : IBqlTable
{
    [PXDBIdentity]
    [PXUIField(DisplayName = "Level ID")]
    public virtual int? LevelID { get; set; }
    public abstract class levelID : PX.Data.BQL.BqlInt.Field<levelID> { }

    [PXDBInt]
    [PXUIField(DisplayName = "Sequence")]
    public virtual int? Sequence { get; set; }
    public abstract class sequence : PX.Data.BQL.BqlInt.Field<sequence> { }

    [PXDBString(8, IsUnicode = true)]
    [PXUIField(DisplayName = "Level Name")]
    public virtual string LevelName { get; set; }
    public abstract class levelName : PX.Data.BQL.BqlString.Field<levelName> { }

    [PXDBDecimal]
    [PXUIField(DisplayName = "Threshold Amount")]
    public virtual decimal? ThresholdAmount { get; set; }
    public abstract class thresholdAmount : PX.Data.BQL.BqlDecimal.Field<thresholdAmount> { }

    [PXDBInt]
    [PXSelector(typeof(Search<Users.pKID>),
        SubstituteKey = typeof(Users.username),
        DescriptionField = typeof(Users.fullName))]
    [PXUIField(DisplayName = "Approver")]
    public virtual int? ApproverID { get; set; }
    public abstract class approverID : PX.Data.BQL.BqlInt.Field<approverID> { }
}
This structure allows defining multiple approval levels with different thresholds and designated approvers.
Dynamic Approver Determination
The appropriate approver might vary based on document attributes. For example, different departments might have different approval chains. This logic can be encapsulated in a service class:
public class ApprovalService
{
    public static int? GetNextApproverID(MyDocument document, PXGraph graph)
    {
        // Get current approval level
        int currentLevel = document.ApprovalLevel ?? 0;

        // Find next approval level based on document attributes
        ApprovalLevel nextLevel = PXSelect<
            ApprovalLevel,
            Where<ApprovalLevel.sequence, Equal<Required<ApprovalLevel.sequence>>,
                And<ApprovalLevel.departmentID, Equal<Required<ApprovalLevel.departmentID>>,
                And<ApprovalLevel.thresholdAmount, GreaterEqual<Required<ApprovalLevel.thresholdAmount>>>>>
            >
            .Select(graph, currentLevel + 1, document.DepartmentID, document.TotalAmount)
            .FirstOrDefault();

        return nextLevel?.ApproverID;
    }
}
This method finds the next appropriate approver based on the document’s current level, department, and amount.
Notification Configuration
Workflow effectiveness depends on timely notifications to keep the process moving. Acumatica provides notification templates that can be leveraged in custom workflows.
Creating Notification Templates
Templates should be created through the Notification Templates screen (SM204003) with appropriate token substitution:
Subject: [Document #{$Document.RefNbr}] requires your approval

Body:
Dear {$Approver.FullName},

Document #{$Document.RefNbr} requires your approval.

Amount: {$Document.Amount}
Description: {$Document.Description}
Submitted by: {$Document.SubmittedBy}

Please click the link below to review this document:
{$RecordLink}

Thank you,
Acumatica Notification System
Triggering Notifications Programmatically
Custom workflows need to trigger these notifications from code:
protected virtual void SendApprovalNotification(MyDocument doc, int? approverID)
{
    if (approverID == null) return;

    // Create notification
    Notification notification = CreateNotificationRecord(
        "APPROVAL_REQUEST",  // Template name
        doc,
        approverID);

    // Send notification
    NotificationProcessor.SendNotification(Base, notification);
}

protected virtual Notification CreateNotificationRecord(string notificationCD, MyDocument doc, int? approverID)
{
    NotificationSetup setup = PXSelect<
        NotificationSetup,
        Where<NotificationSetup.notificationCD, Equal<Required<NotificationSetup.notificationCD>>>>
        .Select(this, notificationCD);

    if (setup == null) return null;

    Notification notification = new Notification();
    notification.SetupID = setup.SetupID;
    notification.RefNoteID = doc.NoteID;
    notification.NotificationCD = notificationCD;
    notification.RecipientID = approverID;

    return notification;
}
This approach uses Acumatica’s notification framework to send consistent, template-based communications.
Custom Action Development
Standard button actions often need augmentation with custom logic for complex workflows.
Adding Custom Actions to Data Entry Screens
Custom actions are added to screens by defining PXAction properties in the graph:
public PXAction<MyDocument> EscalateApproval;
[PXButton]
[PXUIField(DisplayName = "Escalate")]
protected virtual IEnumerable escalateApproval(PXAdapter adapter)
{
    foreach (MyDocument doc in adapter.Get<MyDocument>())
    {
        if (doc.Status != MyDocumentStatus.PendingApproval)
        {
            throw new PXException("Only documents in Pending Approval status can be escalated.");
        }

        // Get manager of current approver
        int? managerID = GetManagerID(doc.CurrentApproverID);
        if (managerID == null)
        {
            throw new PXException("No manager found for escalation.");
        }

        // Update approver
        doc.CurrentApproverID = managerID;
        doc.LastEscalationDate = PXTimeZoneInfo.Now;

        // Notify new approver
        SendApprovalNotification(doc, managerID);

        this.Save.Press();
        yield return doc;
    }
}

private int? GetManagerID(int? employeeID)
{
    if (employeeID == null) return null;

    // Query organizational structure to find manager
    EPEmployee employee = PXSelect<
        EPEmployee,
        Where<EPEmployee.userID, Equal<Required<EPEmployee.userID>>>>
        .Select(this, employeeID)
        .FirstOrDefault();

    return employee?.ManagerID;
}
This pattern encapsulates the entire escalation process within a single action, including validation, state changes, and notifications.
Integrating External Systems in Workflows
Many workflows need to interact with external systems. For example, a purchase approval might need to check budget availability in a separate financial planning system.
Implementing External Service Calls
External system integration is typically implemented through service classes:
public class BudgetValidationService
{
    public static bool ValidateBudgetAvailability(string departmentID, string accountID, decimal amount)
    {
        // Create HTTP client for budget system API
        using (HttpClient client = new HttpClient())
        {
            client.BaseAddress = new Uri("https://budgetsystem.example.com/api/");
            client.DefaultRequestHeaders.Accept.Add(new MediaTypeWithQualityHeaderValue("application/json"));

            // Create request payload
            var payload = new
            {
                DepartmentID = departmentID,
                AccountID = accountID,
                RequestedAmount = amount
            };

            // Call API
            HttpResponseMessage response = client.PostAsJsonAsync("budget/validate", payload).Result;

            if (response.IsSuccessStatusCode)
            {
                // Parse response
                var result = response.Content.ReadAsAsync<BudgetValidationResult>().Result;
                return result.IsApproved;
            }

            // Log error
            PX.Data.PXTrace.WriteError("Budget validation failed: " + response.ReasonPhrase);
            return false;
        }
    }

    private class BudgetValidationResult
    {
        public bool IsApproved { get; set; }
        public decimal AvailableBudget { get; set; }
        public string Message { get; set; }
    }
}
Key Takeaways for Acumatica Workflow Customization
Building effective custom workflows in Acumatica isn’t just about writing code; it’s about deeply understanding your business processes and leveraging the platform’s architecture to create scalable, maintainable solutions. Remember these core ideas:
- State machines are your friend: They provide a clear and robust model for managing complex process flows.
- Approval hierarchies need careful design: Whether role-based or organizational, ensure your logic correctly routes approvals to the right individuals under the right conditions.
- Notifications are crucial for user adoption: Make them clear, concise, and timely.
- External integrations unlock greater power: But handle them carefully with robust error handling and security in mind.
Customizing workflows in Acumatica can seem daunting, but by breaking down the problem into these manageable components (states, transitions, actions, approvals, and notifications), you can architect powerful solutions that deliver significant business value.
Have you tackled complex workflow customizations in Acumatica or other ERPs? What challenges did you face, and what successes can you share? I invite you to connect with me on LinkedIn to discuss your experiences and insights.